
English Paper Piecing with Hexagons Tutorial
Lately, I have heard a ton of buzz around my quilting world regarding Hexie Quilts and English Paper Piecing (EPP). Many have either tried to get information on how to make them or tips and techniques that will help make them better. Therefore, I have decided to write a short tutorial on the subject.
EPP is one of my go-to’s when traveling (everything fits in my travel bag), or when I just want to hand stitch for that relaxing entertainment. There is just something about sitting down and making hexies that I find completely distressing. It is also something I learned to do from my mother, and I taught it to my daughter. Therefore, I have some great memories that go along with it.
One of the most popular EPP Hexagon patterns is called, “Grandmother’s Flower Garden.” However, I have to tell you there are so many patterns out there and other shapes besides the Hexagon. Any shape can be used, as long as you can fit the pieces together. Some of the other names of these quilts are Mosaic Quilts, Honeycomb, and Six Sided Patchwork. You can find many books with various patterns of EPP. The “Grandmother’s Flower Garden,” apparently, dates to somewhere around 1920-1930s. It was a popular pattern during the Great Depression. As it allows you the opportunity to use various types of scrappy fabrics, we can see why this would be popular during that time. EPP with Hexagons has been around a lot longer. According to many different online websites, it can be dated back to the 1700s in England. With immigration to the United States, I believe I read that the earliest EPP Hexagon quilt was dated around 1807. Understand that they didn’t date quilts at that time, have posting and social media, and I’m sure not very many quilts of that time are still around for us to see. Therefore, I can believe that it may have been around even longer, we just don’t have records of it.
So, let’s get quilting!
To get those perfect sized Hexies, I use a precut frisker hexagon that you can find at many crafting type stores. I own different sizes. One size (I believe is the extra-large with Friskar) has 1” sides and finishes at 2 inches. This is also the one I am using to make my “Grandmother’s Flower Garden” and to do this tutorial. The other size (I believe is the large with Friskar) has ¾” sides and finishes at 1.5 inches.
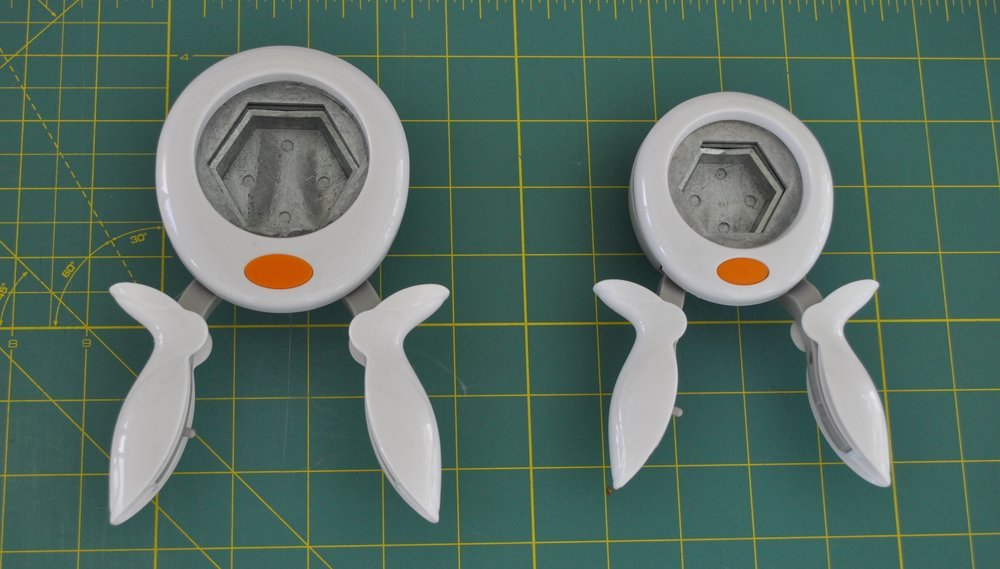
The one on the left is the die cut I am using for my “Grandmother’s Flower Garden.”
You can buy precut EPP Hexies. I just personally like to save money where I can to be able to buy more fabric. You can actually cut your own Hexies too. You will just need to be very careful that they are the same size across the sides, so that those pieces will fit together.

I also use index cards for the paper. I have been saving Christmas cards that I don’t want to keep and advertizing cards that I get in the mail for when I run out of those index cards. You can use any type of thicker paper, or card stock, which will hold its shape.
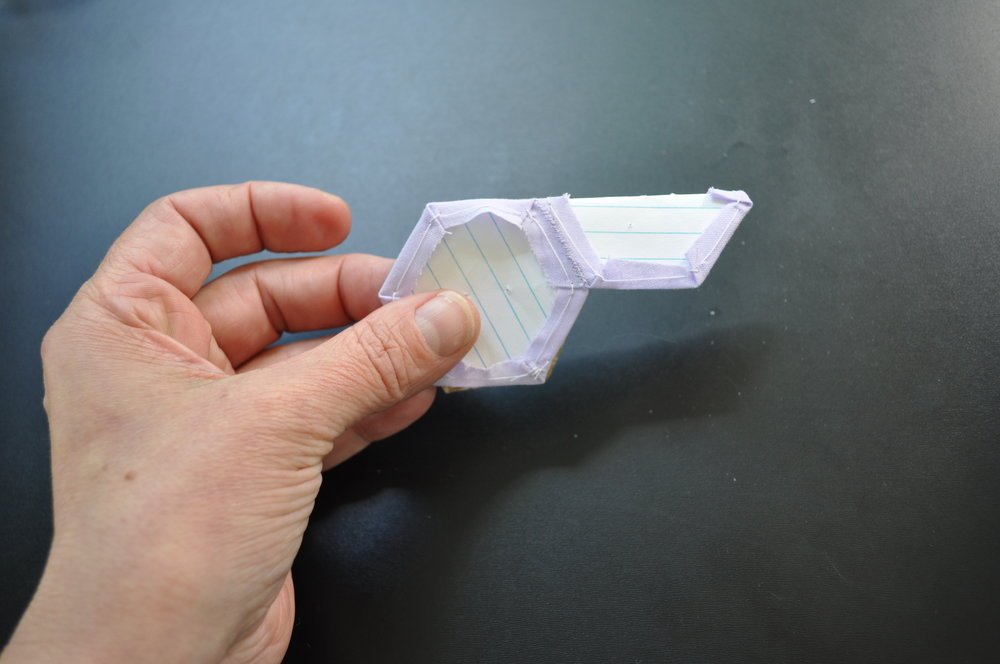
Once you have your paper cut into Hexies, you then want to precut your fabric. I precut my fabric to be a bit more than a ¼” than the Hexie. I find it is easier to baste the fabric around the hexagon paper this way. Although you could use a ruler and get it exactly in the right shape, I have found that being exact isn’t necessary. Besides money saving ideas, I also like time saving ideas: Money for more fabric and time to make more quilts with the fabric!

I usually like even bigger seam allowances, but these will work. I have found it just makes it easier to hold.
The next step is basting. This is a ton lots easier than basting a quilt, for sure! The first thing you want to do is place your hexie paper onto the wrong side. Then take a pin and pin it through the center on the fabric side of the hexie. I found that when I pinned on the paper side, the thread would sometimes get tangled onto the pin. Although sometimes it still gets caught in the pin, it is a lot less frequent. Some like to use glue. I have yet to figure that out, as you want to be able to take the paper out later. My mother once worked with an online group where they exchanged hexies with each other across the world. She stated that some people sent hexies that were glued, and it was a nightmare getting the paper out. But, like I said, it is a method that some people enjoy and use. (Update: I currently use Sue Daley Glue Pens by Sewline.)

Notice that the pin is inside of the paper line. The hexagon paper is larger than where the pin sits.
As far as the needle I use to sew them, to be honest, it is just any ol’ needle I can find. I struggle with small eyes, so I tend to find needles with a larger eye instead of the itsy bitsy ones. My mother and I use a 9 Between. The bottom line is you use whatever is comfortable for you. However, many use the Betweens or Milliners Needles. The one reason my mother doesn’t use the Milliner Needles is because she says they bend too easy. Funniest thing I ever saw was my mom hand stitching a quilt with a bent needle because she got attached to the needle. LOL It is a true story, needles will bend and you do get attached to them.
The thread I use to baste is white and the cheapest thread I can find. In my mind, it is just for basting and will not show through 2 layers of fabric. Some people like to use Aurfil thread as it doesn’t seem to wrap on itself when you pull longer threads to sew with. Ugh, I do hate when that happens. However, I don’t seem to have that problem during basting.
I begin with thread as long as my arm. Meaning, I measure the thread holding the spool in my palm and pulling a piece long enough to reach the top of arm below the shoulder. Then, I make a quilter’s knot. You can catch a tutorial video by clicking here. Next, you want to fold one of the corners into a miter corner. Holding it together by pinching it closed, take the needle and run it through the underside of the mitered corner.

Then, back stitch through the same corner to hold the corner together. Never go through the paper, just go through the fabric.

Next, fold over the next corner into a mitered corner and sew it down like you did the first one. You will continue this until all the corners have been sewn. According to some, you do not have to travel back all the way to the first corner. This will leave you with five sides with basting thread. However, I have always travelled back to the beginning. I again back stitch to secure, knot my thread, and cut. I baste the center hexie and the all of the first row of hexies. Because I like to watch progress happen more quickly, I then sew those hexies together, before I baste the next ring of pedals.

I line up the center with all the hexies in the next ring, just to be sure that they all will fit just way I want it to.

To sew them together, you take the center hexie and one of the first row hexies and put them right sides together. After making a quilter’s knot on a piece of arm length thread, begin to sew them together in one of the corners. I usually sew through the corners 2 times. This helps keep it secure and prevents any holes in the corners.

It is important to use a thread that is about the same color of the hexies to help prevent the stitches from showing on the right side.

It is hard to tell, but I am using a light pastel purple to get as close as I can to the color of the fabric.
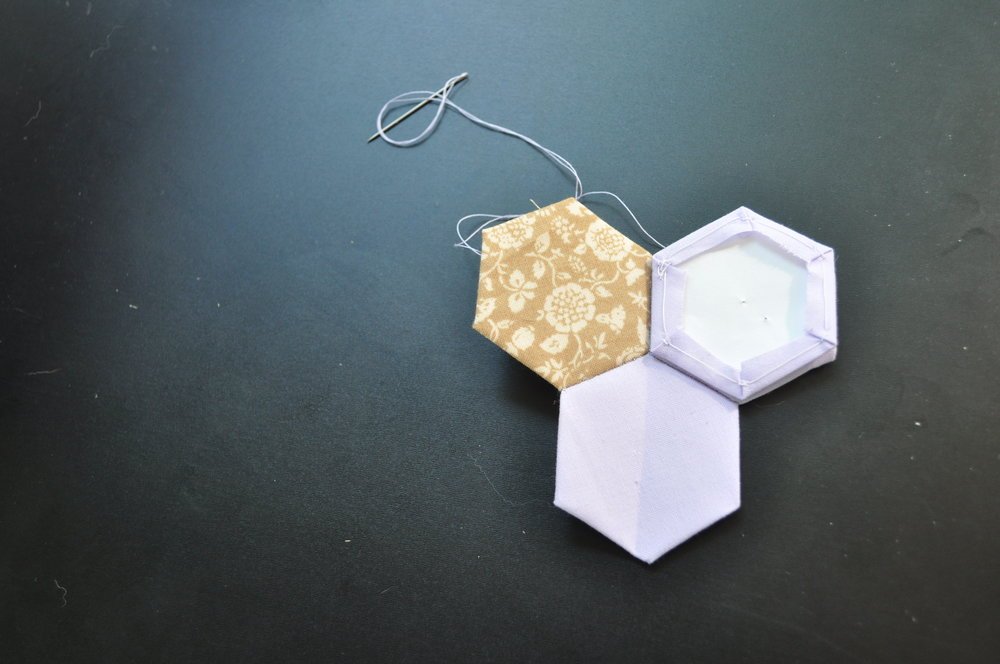
Using a whip stitch, sew through the folds across to the other corner. Only sew through a few threads on the fold, and not the paper. If you take too much of the fold, it will also show through on the right side. Once you reach the next corner, sew 2 times to anchor that corner. Open up your hexies with right side facing. Then, I grab another hexie. This one I place right sides together with the pedal I just sewed to the center.

I then sew 2 times in the corner and whipstitch to the outside. Once I reach the end, I back stitch back a bit towards the middle, knot, and cut thread. Open up the hexies, fold the hexi that was last added down (right sides together) to the center, sew twice in the corner, whip stitch to the next corner, and add another hexie as we did before.

You can see that I need to attach the left hexie to the center one.
Folded the left hexie down to the center hexie. Will begin to sew in the top right corner out to the left.
Once that second pedal was attached to the center, I opened up the flower, and will add the 3rd pedal to the second. I haven’t broken thread yet. I will break thread when I finish adding the 3rd pedal to the 2nd, as we are sewing from inside corner to the outside.
Continue just this way until you have 6 hexies on that first row. Once all the first row is completely surrounding the center and all connected, you can remove the paper from the center one. The rule is: once a hexie is completely surrounded on all sides, the paper can come out. To keep its shape, the outside row must keep its paper. You will want to remove them as you sew along because it makes the quilt much easier to work with. If your paper hasn’t been folded too much and/or gotten soft, you can reuse those papers. Update: After posting this tutorial, I have since learned a new knot to tie off my thread before cutting, The figure Eight Knot (Knicker Knot). I have also made a suggested pathway for you to stitch your hexagons into a flower pattern.

Center is completely surrounded. Paper has been removed.
I then baste my next row of pedals for the flower and attach as we did the last row. The second row of pedals has 12 hexies. Once all 12 hexies are sewn on and together, remember that you can take the paper out of the first row of pedals.

2 different flowers that I will use in my wall hanging.

The first row of pedals is completely surrounded. Therefore, the paper comes out. This makes the flower so much easier to work with when I add my path.
You have a couple of options at this point. You could make a bunch of flowers or all the flowers you plan to use in your project. OR….you can begin to attach them together. This method allows you to see progress and you may find more instant gratification. I, originally, was just making all the flowers, but I think I will begin to attach them together.
Looking at this picture of an antique Grandmother’s Flower Garden, you see there that person used white between their flowers. That white part is called the path. Some use green for their path, some use white…truth be told though, you can use whatever color you want to!

Oh….so beautiful! Pulled this picture of an antique Grandmother’s Flower Garden quilt from the Women Folk website.
“Grandmother’s Flower Garden” is just one of the many hexagon EPP patterns out there. You can even create your own design. I found a free pdf document somewhere out on the web at one point, and saved it (https://incompetech.com/graphpaper/hexagonal/). It is an entire sheet of hexagons that you can use to design your own pattern. Just use colored pencils or your favorite coloring tools. What fun! You can get this pdf document here. I believe I will do one of my own designs after I finish my wall hanging “Grandmother’s Flower Garden.”
If you have any questions, please feel free to email me through the Contact button or by emailing angel@haloinspired.com. I am also planning a tutorial video on hexies. For some, it is easier to watch and learn than read and learn.
Until next time, may you continue to be inspired, productive, and joyful! And never stop making your dreams in quilting come true!